PENCIL DRAWING · BEGINNER GUIDE
How to Draw a Rose: 8 Easy Pencil Steps for Beginners
To learn how to draw a rose, start with a small curled center, wrap a few petals around it, and work outward. Add the stem and leaves after the flower feels balanced. You do not need to copy every fold: a few clear overlaps can make a simple rose drawing feel three-dimensional.
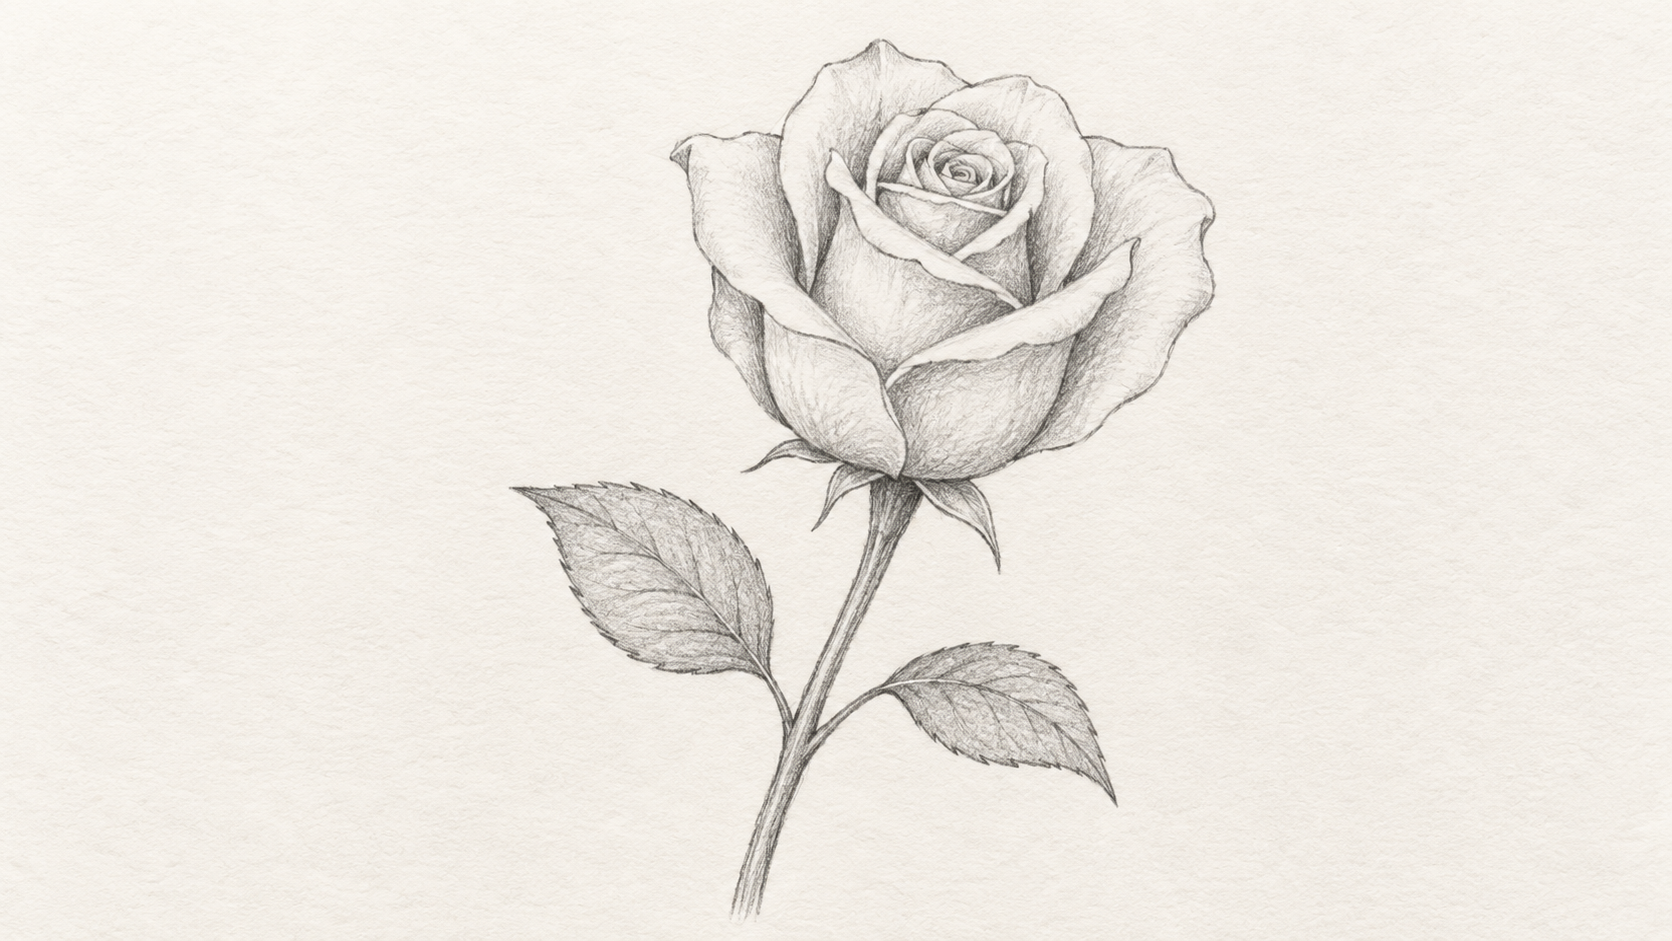
What you need before you start
Use plain paper, an ordinary HB pencil, and an eraser. A softer pencil is optional for the last shadows. Keep your first marks light enough to erase without scrubbing the paper. If you want a clean ink outline, wait until the pencil shapes look right before tracing them.
Leave the upper half of your page for the bloom and the lower half for the stem. This guide draws a rose seen slightly from above, so you can see into its center. The reference is a guide to the shapes; your petal edges and leaf positions can be different.
Want a shorter warm-up first? Try the six-step cat drawing tutorial, or browse our nature drawing references for more flower shapes.
How to draw a rose step by step
STEP 1 / 8
Place the flower with a light guide
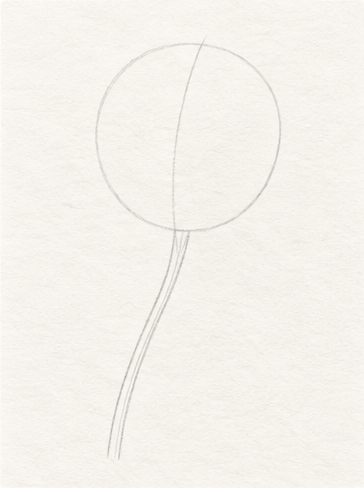
Light gray construction lines place the bloom and stem. Lightly sketch an oval where the bloom will sit. Make it a little wider than it is tall, and leave a generous margin around it for the outer petals. Add a faint vertical mark under the oval to suggest the stem direction. This is a construction guide, so it is fine to change or erase it later.
Check your drawing: Before adding details, check that there is room for both the flower and the leaves.
STEP 2 / 8
Draw a loose curl for the rose center
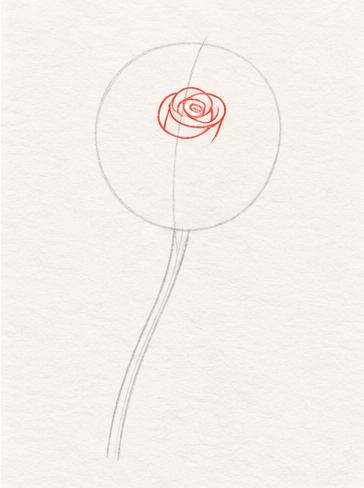
Black lines are already drawn; red lines show what to add in this step. Near the upper middle of the oval, draw a much smaller tilted oval. Inside it, add a short curved line that curls inward without closing into a tight spiral. Leave white space between the lines. The center should feel like a folded strip of paper, with an opening you can look into.
Check your drawing: If the center looks like a target, open one of the rings and make the curves less evenly spaced.
STEP 3 / 8
Wrap a cup-shaped petal around the center
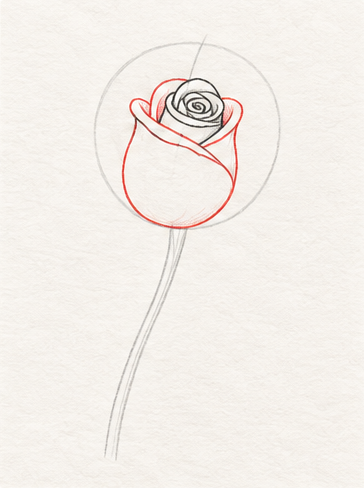
Black lines are already drawn; red lines show what to add in this step. Start beside the small oval and sweep a curved line down, underneath it, and back up on the other side. This creates a rounded cup holding the flower center. Add a short curved rim across part of the cup, then stop it before it crosses the inner curl. That interruption suggests one petal sitting in front of another.
Check your drawing: Keep the bottom rounded rather than pointed. The first cup gives the bloom its main volume.
STEP 4 / 8
Add two overlapping side petals
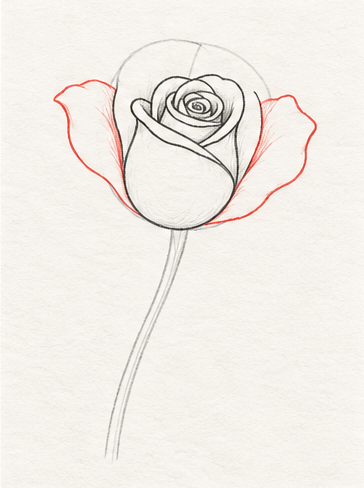
Black lines are already drawn; red lines show what to add in this step. Draw a broad curve outside the left side of the cup, then bring its lower end toward the base of the bloom. Add another on the right, starting a little higher or lower. Let the side petals tuck behind the central cup: stop their lines where they meet a front edge instead of drawing through it.
Check your drawing: Use different widths for the two petals. Perfectly mirrored sides can make the flower look stiff.
STEP 5 / 8
Open the outer petals
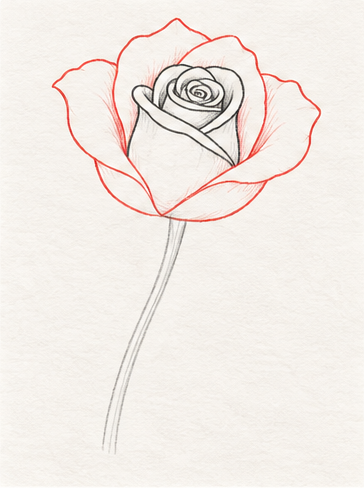
Black lines are already drawn; red lines show what to add in this step. Around the small bloom, add three or four larger petals. Begin with wide, shallow arcs near the top and sides, then curve them inward toward the base. Give one edge a soft dip and another a slight outward roll. Avoid outlining a full circle around everything; separate, uneven petal edges make the silhouette easier to read.
Check your drawing: Pause and look at the whole flower. Erase the visible parts of the original guide oval, keeping only the petal edges you want.
STEP 6 / 8
Connect the bloom to a curved stem
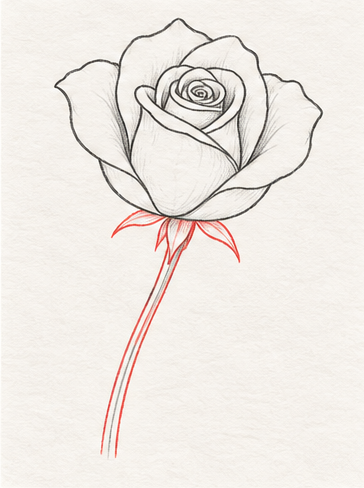
Black lines are already drawn; red lines show what to add in this step. Below the flower, draw two or three narrow, pointed shapes that turn away from its base. These are the sepals. From between them, draw a long, gently curved line downward. Add a second line beside it to give the stem thickness, allowing it to taper slightly toward the bottom. Keep the curve relaxed rather than ruler-straight.
Check your drawing: Make sure the stem appears to support the bottom of the bloom, rather than attaching to a side petal.
STEP 7 / 8
Draw the leaves and their veins
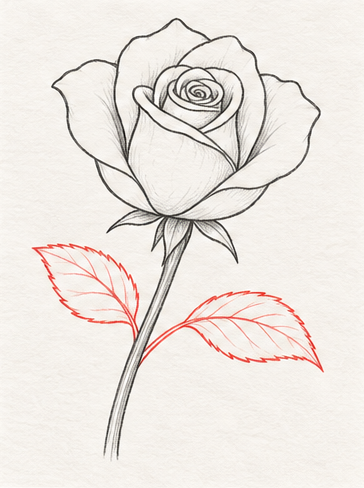
Black lines are already drawn; red lines show what to add in this step. Add a short stalk on one side of the stem. From its tip, draw two curved edges that meet at a point to form a leaf. Add a second leaf at a different height on the other side. Draw a center vein through each leaf, then a few light side veins that angle toward its tip. Small edge notches are optional.
Check your drawing: Leave space between the leaves and the bloom. Clear gaps keep the silhouette readable.
STEP 8 / 8
Clean the outline and add soft shadows
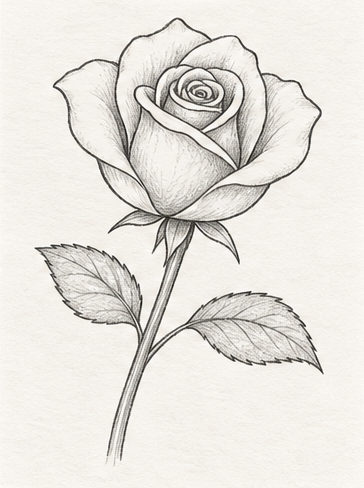
The final image cleans the outline and adds soft pencil shading. Erase any remaining construction marks and choose which outlines need to be clearer. Imagine the light coming from the upper left. Shade lightly beneath overlapping petal rims, inside the curled center, and along the lower-right side of the bloom. Use strokes that follow each curved surface. Leave the exposed petal edges mostly white, and stop before every gap becomes dark.
Check your drawing: For a simple line drawing, skip the shading. Clear overlaps and a complete silhouette are enough to finish.
If your rose drawing looks flat
The petals look like rings
Break the circular pattern. Vary the width of adjacent petals and stop a back edge where a front petal overlaps it. You can fix a confusing overlap before adding any shading.
The center is too dark
Lift a little graphite with the eraser and reopen the tiny white spaces between folds. Build the shadows gradually instead of pressing hard at the beginning.
There are too many lines
Keep the main edges and erase a few small folds. A beginner rose does not need every crease in the reference to be recognisable.
Questions about drawing a rose
What is the easiest way to draw a rose?
Start with a loose curl, surround it with a cup, and add a few broad outer petals. Practise that small bloom on its own before adding a stem, leaves, or shading.
How many petals should I draw?
There is no required count for this simplified drawing. Try the central cup, two side petals, and three or four outer petals. Add another only if it helps the shape, rather than filling every empty space.
Can I draw a rose with a pen?
Yes. If you are unsure of the placement, sketch lightly in pencil first, trace the chosen outlines with a pen, and let the ink dry before erasing the guides. You can also practise directly with a pen and accept the extra marks.
How do I make the petals look softer?
Use rounded changes of direction, vary the edges, and keep most of the shading light. Reserve darker marks for a few overlaps instead of outlining every petal heavily.
Try the same rose with fewer lines
Now that you have worked through how to draw a rose, try a second version with just the center, five broad petals, and a stem. Compare the two drawings: notice which overlaps explain the flower and which small marks you can leave out. Keep the version that feels clearest to you.